It occurs to me that I've never written an article on the most important foundational architecture decision I took, which is the method in which I use to publish things from my home safely and reliably.
Let's dive in. I'll try to make this one a simple article so it's more accessible to the masses. Self hosting is a good thing for anyone to do, after all, as it fights centralization!
Note: This article was last updated on August 4th, 2023.
Background:
Self hosting usually involves you having some kind of device at home that has a server on it, such as a web server (For the sake of this article, we're going to assume you want to use a web server on something itty bitty like a Raspi).
You want to make this available to the whole world wide web, but you want to do this securely and without screwing up your home net. However, hosting things at home via traditional methods, such as port forwarding, can expose you to the following problems:
- Revealing your home IP
- Dealing with obnoxious and unreliable Dynamic DNS configurations
- Clearly giving away the fact that you're breaking your ISP's ToS
- Potential ISP level port blocks or CGNAT issues
- Mommy and Daddy won't let you do port forwarding on the family router
The method that I use completely bypasses every single one of these problems for a slight cost (you need a VPS with a static IPv4 address). Here's a diagram of what we're going to do:
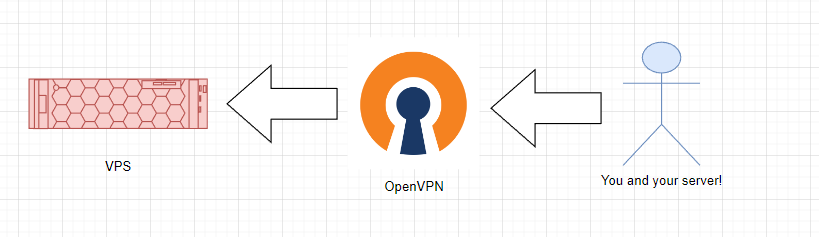
Here's a bullet point list of what we intend to do based on this simple diagram:
- You're going to set up a VPS at a cloud provider somewhere.
- You're going to make that VPS an OpenVPN server.
- You're going to take your server at home and make it an OpenVPN client.
- You're going to use your VPS as a reverse proxy to access the web server via the OpenVPN's virtual IP address, which is static.
What does this get you?
- Your web server is published via the VPS IP, but is actually just forwarding traffic to your server as a reverse proxy!
- Your VPS IP will never change, and because the OpenVPN tunnel has internal IP addresses, those will never change either, even if your ISP changes your home IP!
- If your server or ISP at home goes down, your OpenVPN client will automatically re-negotiate the tunnel without your intervention when it comes back!
- Nobody will ever know you're hosting anything at home, as the traffic is just encrypted UDP packets, and your IP will just be the VPS IP! This also works around port or ISP blocks (assuming they don't block OpenVPN)!
- Because the client is making an outbound request, no port forwarding is required!
Configuration:

So, I use a far more advanced version of that above diagram which you can find on my blog, so I don't have a command-by-command example on how to do this particular simplified version of the idea, but I can guide you to where you need to go. The first step is getting yourself a VPS (which you can use my BuyVM referral if you'd like and if they have stock - check the donations page for that). I'd recommend Debian 11 for the OS on both the VPS and your home server. Once you've done that, come back here and we'll continue.
For the OpenVPN server portion, please follow this DigitalOcean guide. Here's some extra pointers to get you along:
- For the CA generation step (Step 2), use the server you have at home as the second server. EasyRSA comes with OpenVPN, so go ahead and install it early. You probably don't want to use your VPS as the CA provider as it will have private keys that are critical to your infrastructure.
- Do not change the port and protocol as this is unnecessary, and the non-default credentials part is also not required.
- Skip Step 7. Use the following instructions instead after you've generated your first client certificate (you only need one unless you're adding multiple home servers and you're not aggregating them through a router like pfSense):
- mkdir /etc/openvpn/ccd
- cd /etc/openvpn/ccd
- nano client1
- ifconfig-push 10.8.0.5 10.8.0.6
- In your server.conf somewhere, add this: client-config-dir ccd
- What the commands above do is set a static IP on 10.8.0.5 for the client named client1. This is the IP address that refers to the server you have at home. Doing this ensures that your machines are always reachable at the same spot every time. For more advanced configurations requiring more than one client, see this OpenVPN post for more info.
With the DigitalOcean OpenVPN guide out of the way, hopefully you have an established tunnel between your home server and your VPS. Ping 10.8.0.1 and 10.8.0.5 from each. The one with the higher latency is the one going through the tunnel, the other is the equivalent to localhost.
Utilizing Your New Tunnel:

So now that you built yourself a neato tunnel, what do you send through it? Well, in our web server example, we'd send through a website of course! Pre-requisites:
- Nginx installed on your VPS with a default config.
- Any web server at all on your home server. Recommended: Internal SSL on your home web server, either self-signed or a new certificate and key generated via your home CA - this encrypts traffic across the tunnel as an extra safety measure.
- A domain name with an A record pointing at your VPS.
- LetsEncrypt configured via certbot or a LE certificate generation method of your choice. More info here.
The general template that I use for Nginx reverse proxies looks like this. What you'll need to do is dump your default site configuration (/etc/nginx/sites-enabled/default) entirely and just shove this in there instead, minus a few changes you'll want to do:
My Reverse Proxy Config Template
The changes you should make are:
- Ensure your LetsEncrypt config, the two SSL certificate config lines, are preserved from your original LE generated config.
- If LetsEncrypt is doing your 80->443 SSL redirect, leave that in there too. Otherwise use this above my template for the redirect: Redirect Config
- Put your own domain name in the server_name line.
- This article assumes your home server is on 10.8.0.5 and the web server is listening on port 443. Leave it if this is correct.
- The line that has the Content-Security-Policy (CSP) in it may not be appropriate for all websites. If it works, great! Leave it be. If something is busted on your site and it's not returning a 502, comment this out first and see if it helps. If it does, either use the CSP provided in the documentation of the web application you're using, comment out the respective proxy_hide_header line as well for the CSP to allow pass-through, or leave it commented out entirely if you're just hosting something static.
My config is pretty heavily armored and includes most things you'd add for a safe website, such as TLS 1.3 and various security headers. It also overrides any headers your home website might try to send back through, just in case, and also forwards the real IP address (instead of the proxy's IP address) back to your web server in case you want to see that info on it instead of the proxy, and sets you up for HTTP/2.
Once you save Nginx and restart it, you should see your home website!
Other Info:
If you get a 502 bad gateway, it means your home server cannot be contacted, so you may need to debug your tunnel or make sure you've got the right IP and port selected in the config.
Note that my configuration involves many, many backend servers and services, so I use pfSense to negotiate these tunnels as a single broker, and then NAT the connections through it to a separate, isolated network. Still, this article uses the same principles.
If you want to publish something that isn't able to be proxied by Nginx (like a Minecraft server or something), might I suggest using Iptables Masquerade rules in your NAT table? Here's an example rule of me sending UDP port 6881 back through the tunnel via iptables instead of using Nginx (because this is not web traffic).
-A PREROUTING -i ens3 -p udp -m udp --dport 6881 -j DNAT --to-destination 10.8.0.5:6881